Cloudflare Tunnel & Zero Trust: Exposing Your Homelab and Docker Without Open Ports or Public IP

🇺🇦 Читайте цю статтю українською
Anyone running a self-hosted Homelab or personal home server (Proxmox, TrueNAS, or an old desktop running Docker) eventually hits the same roadblock: how do you access your private services safely when away from home?
The traditional methods carry significant pain points:
- Carrier-Grade NAT (CGNAT) / Dynamic IP: Over 90% of residential ISPs place subscribers behind CGNAT. You rarely get a dedicated static public IPv4, and ISPs often block inbound port forwarding altogether.
- Router Port Forwarding is Dangerous: Punching holes in your router (forwarding ports 80 and 443) broadcasts your residential IP to the world. As we demonstrated in our Cowrie Honeypot experiment, automated scanners probe open ports within 3 to 5 minutes of discovery. A single vulnerability in your web server or router exposes your entire home subnet.
- VPNs (like Tailscale) Aren’t for Everyone: While Tailscale is unbeatable for private admin work, you cannot easily share a private URL with non-technical family members to view your Immich photos without installing VPN client apps on their devices.
The modern solution to this challenge is Cloudflare Tunnel (formerly Argo Tunnel) coupled with Cloudflare Zero Trust Access.
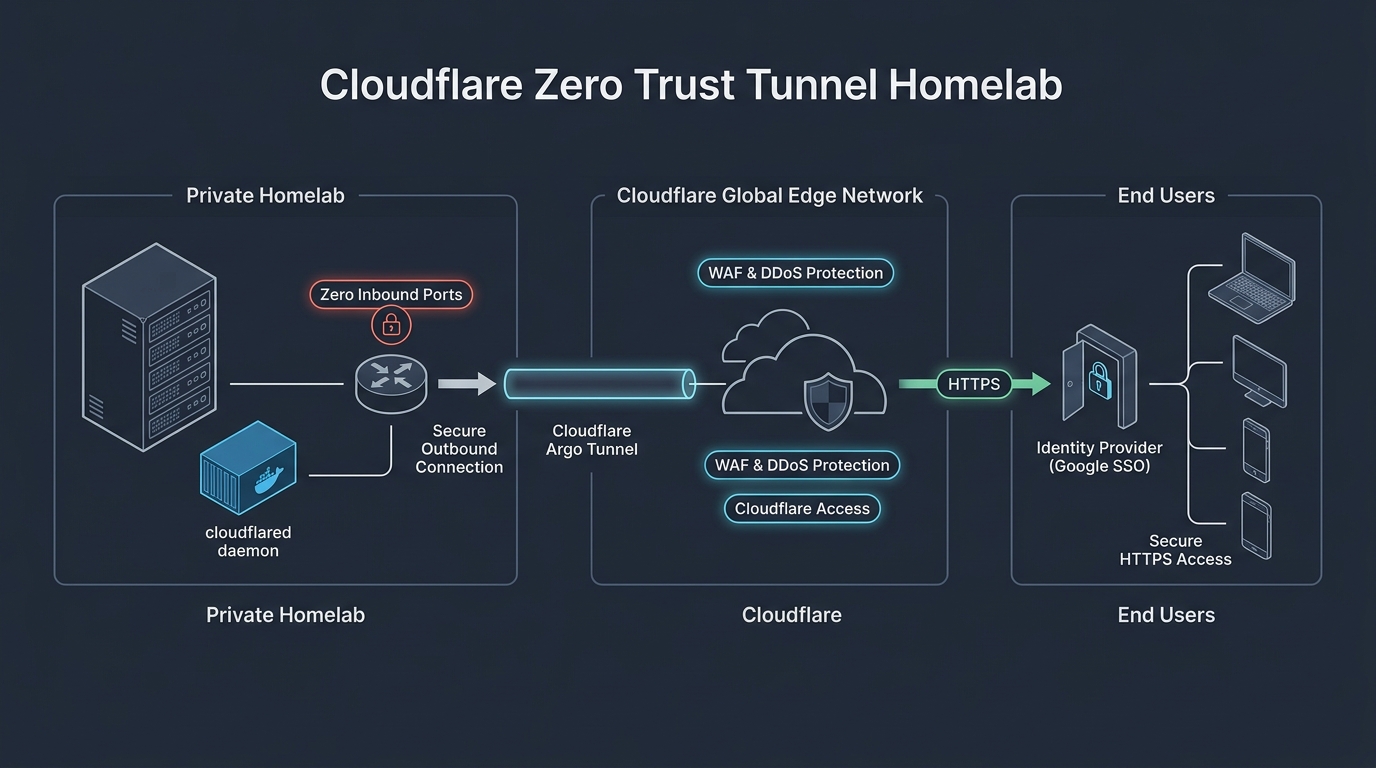 Fig. 1. Cloudflare Tunnel architecture: outbound encrypted connection with zero inbound ports, traffic filtering through Cloudflare Edge, and custom domain access
How It Works: The Power of Outbound Tunnels
Instead of opening incoming doors (inbound firewall ports) on your home router, the lightweight cloudflared daemon running inside a Docker container initiates a persistent, outbound encrypted connection to Cloudflare’s nearest global edge data center.
When someone browses to vault.yourdomain.com:
- The request hits Cloudflare’s nearest global Edge Network node.
- Cloudflare inspects traffic, blocks DDoS floods, and filters malicious bots.
- If Zero Trust Access is configured, an authentication barrier appears (such as Google SSO or a one-time email PIN).
- Approved traffic is proxied through the encrypted tunnel directly into your local Docker container.
The Advantages:
- Zero inbound open ports on your router. Firewall remains strictly closed.
- Bypasses CGNAT, dynamic IPs, and restrictive ISPs (works over 4G/5G mobile modems or Starlink).
- Your residential IP address is 100% hidden.
- Free, automatic SSL/TLS certificate generation and renewal.
Prerequisites
- A custom domain name (costs $2–$10/year from any registrar).
- A free Cloudflare account with your domain’s nameservers pointed to Cloudflare.
- Any machine or server running Docker and Docker Compose.
Step 1. Create a Tunnel in Cloudflare Zero Trust
Modern Cloudflare Tunnels are managed directly via the cloud dashboard without wrestling with manual configuration files:
- In your Cloudflare dashboard, navigate to Zero Trust in the left sidebar (or visit one.dash.cloudflare.com).
- Register your free Zero Trust organization (free tier supports up to 50 users!).
- Head to Networks ➔ Tunnels.
- Click Add a tunnel, choose the default Cloudflare (cloudflared) type, and name it (e.g.,
homelab-docker). - Click Save tunnel.
Step 2. Deploy cloudflared via Docker Compose
On the next screen, Cloudflare provides installation commands for various environments. Select Docker. You will see a command containing a long secret tunnel token:
1
docker run cloudflare/cloudflared:latest tunnel --no-autoupdate run --token YOUR_TOKEN_HERE
To run this as a persistent, reliable service, let’s configure docker-compose.yml.
Create a dedicated directory:
1
2
mkdir -p /opt/cloudflared
cd /opt/cloudflared
Create docker-compose.yml:
1
2
3
4
5
6
7
8
9
10
11
12
13
14
15
services:
  cloudflared:
    image: cloudflare/cloudflared:latest
    container_name: cloudflared
    restart: unless-stopped
    command: tunnel --no-autoupdate run
    environment:
      - TUNNEL_TOKEN=eyJhIjoiYmMy...YOUR_SECRET_TOKEN...
    # Connect to the shared Docker network:
    networks:
      - web-network

networks:
  web-network:
    external: true
Pro-Tip: Placing
cloudflaredinto a shared user-defined Docker bridge network (web-network) alongside your other services (e.g., Uptime Kuma or Vaultwarden) means you don’t even need to publish host ports viaports:! Containers communicate internally using service names (http://vaultwarden:80).
Start the container:
1
docker compose up -d
Return to your Cloudflare browser tab—within a few seconds, the connector status will switch to green (HEALTHY).
Step 3. Routing Subdomains (Public Hostnames)
Now map your private internal containers to clean public subdomains. Navigate to the Public Hostname tab in your tunnel settings and add your routes:
Example 1: Uptime Kuma Status Page
- Subdomain:
status - Domain:
yourdomain.com - Type:
HTTP - URL:
uptime-kuma:3001(or local IP192.168.1.100:3001if running on another node).
Example 2: Vaultwarden Password Manager
- Subdomain:
vault - Domain:
yourdomain.com - Type:
HTTP - URL:
vaultwarden:80
Example 3: Immich Photo Gallery
- Subdomain:
photos - Domain:
yourdomain.com - Type:
HTTP - URL:
immich-server:2283
Click Save Hostname. Cloudflare automatically generates the required DNS CNAME record, issues a valid SSL certificate, and binds the traffic to your container.
Visit https://status.yourdomain.com from your smartphone using cellular data—it loads instantly!
Step 4. Secret Weapon: Cloudflare Access (Zero Trust SSO)
Exposing sensitive administrative dashboards (like Proxmox, Portainer, or Beszel) to the raw public internet carries risks of zero-day exploits and brute-force attempts.
With Cloudflare Access, you can place an identity verification shield in front of any internal web app:
- In the Zero Trust dashboard, open Access ➔ Applications.
- Click Add an application ➔ select Self-hosted.
- Name it (e.g.,
Beszel Monitoring) and assign the subdomainmon.yourdomain.com. - Create an access policy (Policy):
- Action: Allow.
- Rule: Include ➔ Emails — enter your authorized email addresses (e.g.,
you@gmail.com). - Optionally integrate one-click login with Google or GitHub OAuth.
- Save the policy.
What Happens in Practice:
When an external visitor browses to mon.yourdomain.com, the server never serves the Beszel login screen. Instead, Cloudflare intercepts the request with a branded authentication challenge requiring an authorized email and a 6-digit one-time PIN (or OAuth token).
Automated scanners, bots, and Shodan scrapers hit an impenetrable wall.
⚠️ Important Considerations & Constraints
While Cloudflare Tunnel feels like magic, keep these operational limits in mind:
- Video Streaming Restrictions (TOS Section 2.8):
Cloudflare’s free tier terms explicitly prohibit routing excessive non-HTML video streaming (such as terabytes of 4K streams via Plex or Jellyfin). Abusing bandwidth can result in tunnel suspensions. Use direct Tailscale connections for media streaming. - File Upload Size Limits:
Cloudflare enforces a default 100 MB maximum request payload size on free plans. Uploading a 5 GB archive via Nextcloud or syncing a raw 4K video to Immich in a single request will return a 413 Request Entity Too Large error.
Solution: Enable chunked uploads in your client application settings. - SSL Termination at the Edge:
Because Cloudflare operates as a reverse proxy, traffic is decrypted at their edge nodes for WAF analysis before being re-encrypted into your tunnel. If your threat model demands absolute 100% end-to-end zero-knowledge encryption, stick to peer-to-peer WireGuard or Tailscale.
Which One to Pick: Tailscale vs. Cloudflare Tunnel?
Experienced sysadmins universally recommend a hybrid architecture:
| Use Case | Best Tool | Rationale |
|---|---|---|
| Public & Family Access (Immich, Vaultwarden, blogs) | Cloudflare Tunnel | Clean URLs, zero client apps needed, automated SSL |
| Protected Admin UIs (Beszel, Portainer, Proxmox) | Cloudflare Tunnel + Access | Secured with email PIN or Google SSO before app loads |
| Core Infrastructure Admin (SSH, TrueNAS, raw shell) | Tailscale | Direct subnet mesh routing without public DNS visibility |
| Heavy Media Streaming (Plex, Jellyfin, torrents) | Tailscale | Unrestricted bandwidth with zero TOS compliance risks |
Summary
Cloudflare Tunnel is one of the most transformative tools in modern self-hosting. It completely eradicates the frustration of CGNAT, keeps your home network completely sealed against external port scans, and provides enterprise-grade Zero Trust security for free.
Deploy your first tunnel, set up your subdomains, and never worry about residential port forwarding again!