Coolify on a VPS: Building a Self-Hosted Vercel & Heroku for Unlimited Deployments

🇺🇦 Читати цю статтю в оригіналі українською
Every web developer remembers the sense of pure magic when first trying platforms like Vercel, Netlify, or good old Heroku: you execute a simple git push, and within 30 seconds your application is live on a screaming-fast server complete with a production domain, valid SSL certificates, and an active database connection. Zero server wrangling, zero manual nginx configurations!
Eventually, reality sets in:
- Heroku terminated its beloved free tier entirely.
- Vercel and Netlify slap developers with unexpected three-figure invoices for exceeding minuscule bandwidth thresholds or serverless function execution quotas.
- Deploying straight into AWS or Google Cloud requires an enterprise cloud architect certification simply to avoid financial ruin from configuration oversights.
What if you could enjoy the exact same developer experience on your own $4–$5/month VPS, hosting unlimited applications, databases, and pet projects without arbitrary vendor ceilings?
Enter Coolify — the fastest-growing open-source Platform as a Service (PaaS) project in the self-hosting landscape today.
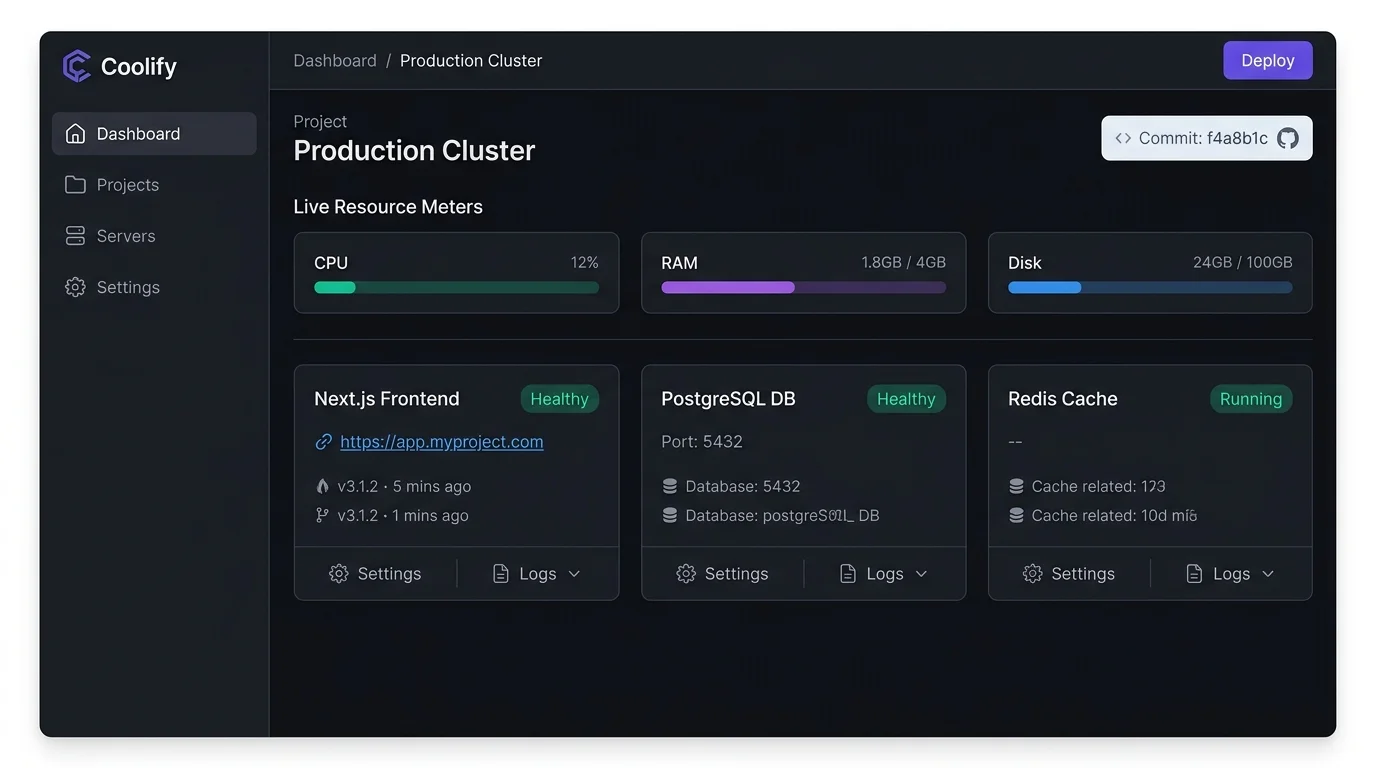 Fig. 1. Coolify main dashboard: live server resource metrics, application clusters, and active database containers
What Does Coolify Deliver?
Coolify transforms any generic virtual server running Ubuntu or Debian into an autonomous, self-sufficient cloud data center:
- Git-Push to Deploy: Connect your GitHub or GitLab repositories. Push a commit to your
mainbranch, and Coolify pulls the code, builds the container, and initiates a zero-downtime deployment automatically. - Automated HTTPS & Custom Domains: An integrated Traefik reverse proxy handles dynamic Let’s Encrypt certificate generation and renewal for every project out of the box.
- One-Click Managed Databases: Spin up PostgreSQL, MySQL, Redis, MongoDB, MariaDB, or ClickHouse instances in under 5 seconds with pre-generated secure connection strings.
- Curated One-Click Catalog: Deploy popular open-source software with a single click: WordPress, Ghost, Plausible Analytics, Vaultwarden, Uptime Kuma, PocketBase, or Supabase.
- Automated S3 Backups: Schedule encrypted database snapshots shipped off-site to any S3-compatible cloud storage (Backblaze B2, AWS, Cloudflare R2).
Hardware Prerequisites
For a smooth developer experience, provision a VPS with the following baseline specifications:
- CPU: At least 2 virtual cores (vCPU).
- Memory: 2 GB RAM minimum (4 GB recommended, as compiling modern Next.js or Astro builds can spike memory during bundle compilation).
- OS: Clean installation of Ubuntu 22.04 / 24.04 LTS or Debian 12.
Step 1. Single-Command Automated Installation
Coolify provides a brilliantly streamlined installation pipeline. Connect to your VPS via SSH:
1
ssh user@your-vps-ip
Run the official bootstrap script:
1
curl -fsSL https://cdn.coollabs.io/coolify/install.sh | bash
The installer executes the following sequence:
- Inspects the operating system and provisions the latest Docker Engine release if absent.
- Pulls production images for the Coolify control plane, Traefik edge proxy, and metadata databases.
- Initializes the entire ecosystem daemonized in the background.
The installation completes in approximately 2–3 minutes. Your terminal will display a congratulatory notification pointing to the management interface: http://your-vps-ip:8000.
Step 2. Initial Setup and Domain Association
- Navigate in your browser to
http://your-vps-ip:8000. - Register your primary administrative account (Email and a resilient master password).
- Configure the Dashboard Domain:
Under instance settings, define the production domain you wish to assign to the Coolify portal itself (e.g.,coolify.sedunlab.com). Ensure you have an appropriate DNSA-recordpointing to your VPS IP!
Coolify automatically issues an SSL certificate, transitioning the management portal to securehttps://.
Step 3. Deploying Your First GitHub Application
Let’s publish a web application (e.g., a Next.js, Astro, or Python FastAPI service):
- From the navigation bar, choose Projects ➡️ Create New Project ➡️ select the Production environment.
- Click + New Resource and select Public/Private Repository (GitHub).
- Authenticate your GitHub account (either via the official Coolify GitHub App for instant webhooks or a standard Deploy Key).
- Select your target repository and production branch (
main). - Coolify inspects the repo to determine the build architecture:
- Uses
Dockerfileif present. - Utilizes Nixpacks (Heroku’s modern open-source successor) if finding a
package.jsonorrequirements.txt. - Orchestrates multi-container apps via
docker-compose.yml.
- Uses
- Define your public domain in the Domains field (e.g.,
app.sedunlab.com). - Click the purple Deploy action button!
Under Deployment Logs, you can monitor dependency resolution, asset bundling, and image tagging in real time. Within 30–60 seconds, the container starts, and Traefik begins serving secure HTTPS traffic instantly.
Step 4. One-Click PostgreSQL Database
If your application requires persistent data storage:
- Inside the same project workspace, select + New Resource ➡️ Database ➡️ PostgreSQL.
- Designate a database name. Coolify generates cryptographic passwords and internal connection strings (
postgres://user:password@host:5432/dbname). - Bind the database to your application container over an internal Docker network bridge without exposing port 5432 publicly to the internet — enforcing textbook security best practices!
- In the Backups tab, configure automated archiving: set a cron schedule (e.g.,
0 3 * * *) and target your remote S3 bucket credentials.
Pro Tip: Always Provision a Swap File!
During frontend bundle compilation (npm run build), Webpack and Vite processes can temporarily demand over 2 GB of memory. If physical RAM is exhausted, the Linux kernel will invoke the OOM killer, aborting your build with an OOMKilled error.
Prevent this permanently by creating a 4 GB swap file on your VPS:
1
2
3
4
5
sudo fallocate -l 4G /swapfile
sudo chmod 600 /swapfile
sudo mkswap /swapfile
sudo swapon /swapfile
echo '/swapfile none swap sw 0 0' | sudo tee -a /etc/fstab
Now, heavy framework builds will run reliably without failing on budget server hardware!
Conclusion: Liberation from Proprietary Cloud Pricing
Coolify represents an extraordinary victory for self-hosting engineers. You retain the polished convenience of top-tier cloud platforms while:
- Locking in predictable, fixed infrastructure costs ($4–$10 VPS hosting instead of variable cloud bills).
- Maintaining absolute ownership over your application data and proprietary schemas.
- Operating with zero constraints on domain names, project count, or bandwidth.
Spin up Coolify on a spare VPS — it will permanently revolutionize how you prototype and ship personal and commercial software! 🚀✨